Image optimization of your WordPress website is one of the surest ways to improve its speed.
Speed for a website refers to the rate at which it loads. It is a ranking signal for both mobile and desktop searchers as announced by Google itself.
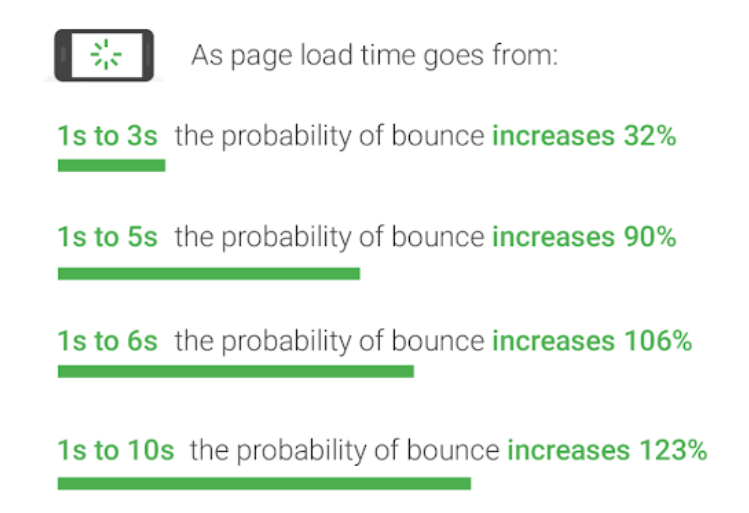
Users want to find answers to their questions quickly and data shows that people care about how quickly their pages load. The website which takes less than 3 sec to load the web page is considered to be the best and it results in gaining more traffic, engagement, and reduced bounce rate.
There are multiple ways to speed up your WordPress website such as choosing a better hosting provider, lightweight themes, removing unnecessary plugins, reducing external scripts, etc., but the easiest of them is WordPress image optimization.
Images consume lots of bandwidth while loading, and thus they play a major role in increasing the load time of websites.
You might have noticed yourself that the text and small images load before the high-resolution images.
Images are essential contributors to the overall UX of your website. People find the text boring without images. Think of your webpage as a comic strip. Most people will not invest their attention in reading a webpage if it has no image.
Let’s look at some of the stats that assert the effectiveness of visual marketing or as I like to call it ‘communication through Images’.
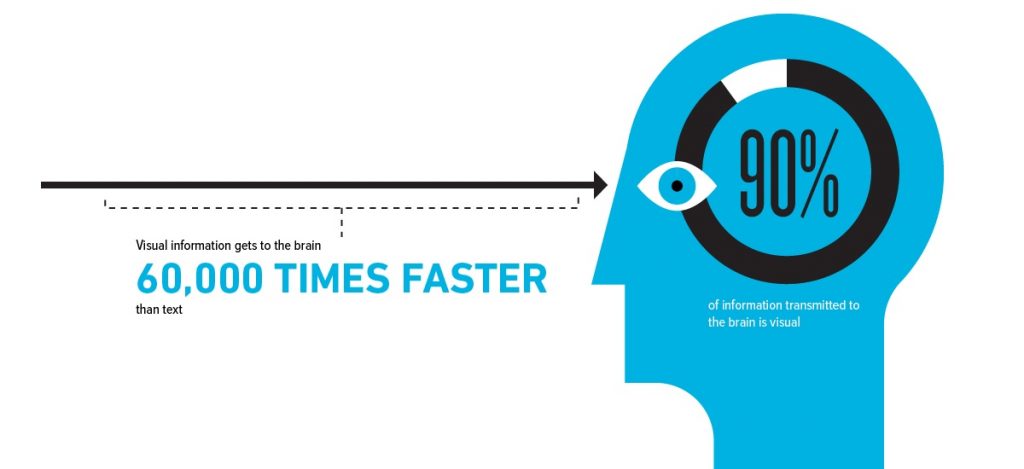
- The human brain processes image 60,000 times faster than text. (source)
- Publishers that feature infographics grow traffic 12% faster than publishers that don’t. (source)
- In responses to a recent survey, 95% of B2B buyers said that they wanted shorter and highly visual content. (source)
Table of Contents
So, In this article, I’ll explain what WordPress image optimization is and different ways to optimize images for your site to make it faster and more efficient.
What Is WordPress Image Optimization?
WordPress image optimization is a process of delivering high-quality images to your audience in the right loading time, the right size, and resolution while ensuring the smallest possible size.
Now, there are multiple ways to optimize images for your WordPress website. For this task, you can use various tools, techniques, and extensions.
Image optimization is the process of curing a larger disease i.e. slow website. But to see if you even need such an effort, take a speed test of your website.
You can use the following tools to check the loading time of your WordPress site:
You can analyze the speed of your site easily using any of these tools and also understand the facts affecting it.
We recommend Google PageSpeed Insights as it gives you a complete assessment of your site speed performance based on the ‘Core Web VItals’ and provides suggestions to improve it.
Core Web Vitals: What’s New & How Your SEO Should Adapt?
Best Practices To Optimize Image For WordPress Website
There are several practices for WordPress image optimization such as:
- Use CDNs For Image
- Use Compressed Images
- Implement Lazy Loading Of Images
- Use Correct Dimension
- Replace GIF with HTML Videos
- Use WebP Image Format
Let’s explore them in further detail.
1) Use CDNs For Image
CDN (Content Delivery Network) is a joint or proxy network of multiple servers and their data in one place.
The ultimate goal of a CDN is to provide high-quality performance to all the users simultaneously.
Using an image CDN will help you in saving 40-80% image file size and quality.
An image CDN is a set of software that enhances the functionality for optimizing and transforming WordPress images in real-time so that we can easily share them.
Some best image CDNs that you can use:
- Fastly
- KeyCDN
- ImageKit
- Cloudflare CDN
- CloudFront CDN
- Google CDN
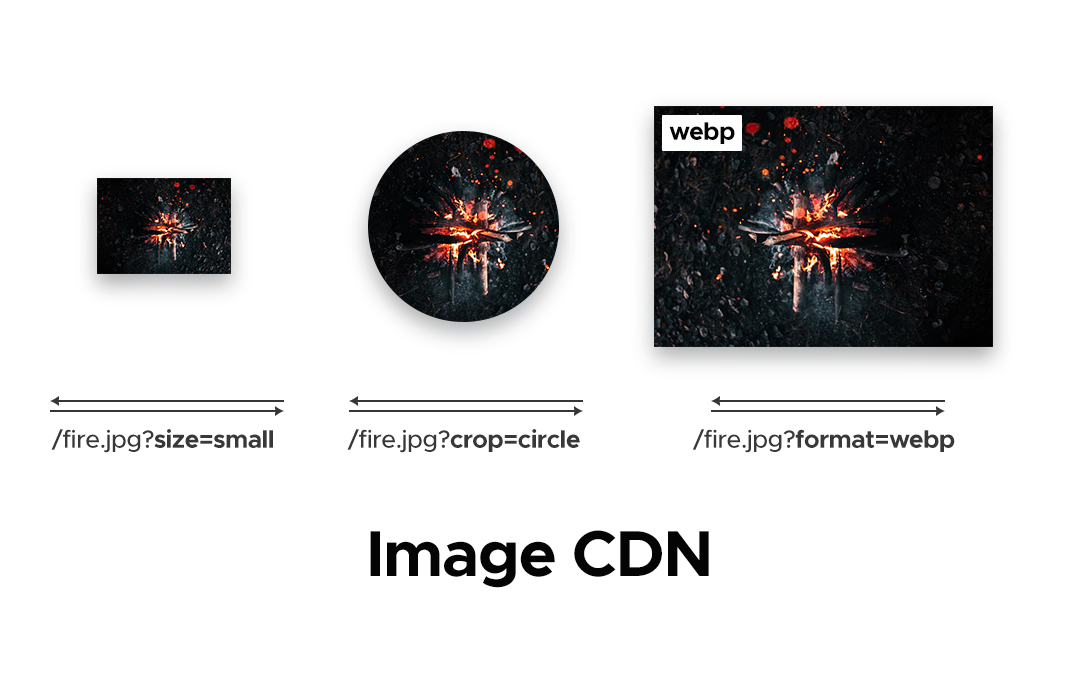
The functionality of image CDNs is that a CDN image URL not only indicates which image has to be uploaded but also defines the parameters like size, format, and quality.
Also, the real-time WordPress image optimization operability of a CDN allows you to create a highly customizable version of an image according to your need.
There are multiple options of image CDNs but all of them have the same functionality to save bytes of your WordPress image and help you in maintaining your page load time.
Other than this, it will help you in maintaining your cost, documentation, and ease of migration.
To get a basic understanding of CDNs, check the image below:
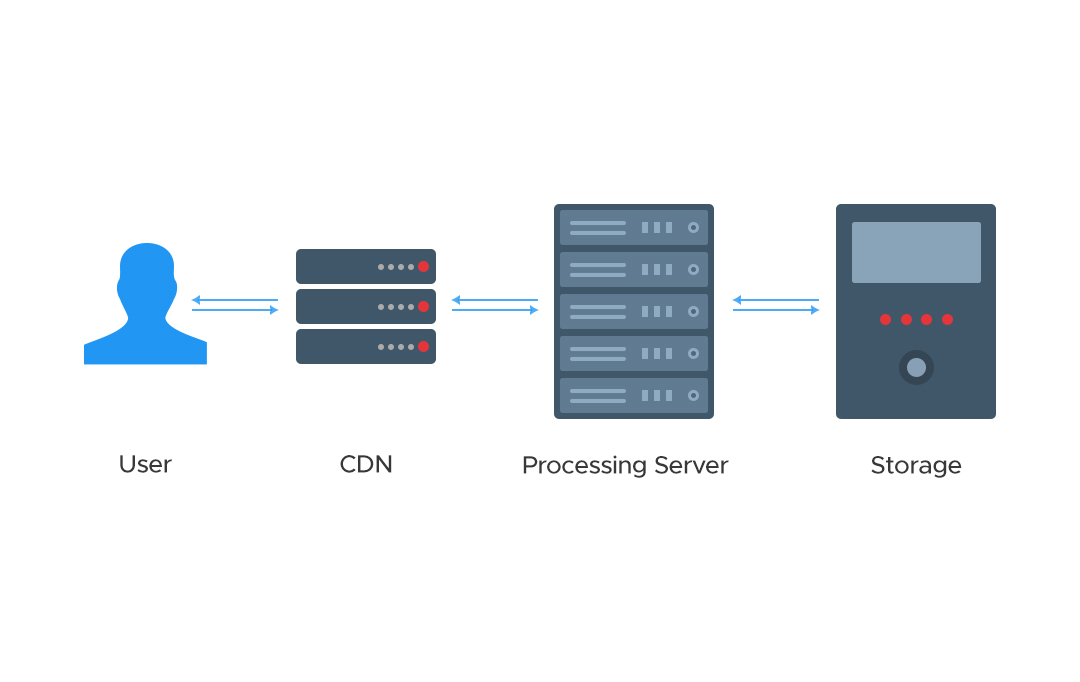
Let’s see how these come together to deliver the intended functionality.
- First, if a user requests an image, it passes through the CDN image delivery part.
- Second, it checks whether the CDN has an image cached on its server or not. After that, it passes through the processing server to request the image if not present in the cache.
- Lastly, it goes to storage, where CDN sends back the existing copy image that is requested by the user.
Sometimes if the existing copy of the image is not sent back, then the processing server does all the optimization and transformation of the requested image in built-in time and sends it back to CDN.
WordPress CDN: A Comprehensive Guide
2) Use Compressed Images
Using compressed images is another best practice to optimize WordPress images.
But why should you stress about compressing images in the first place?
Compressed images are those that are optimized and are in perfect size and dimensions
without degrading the quality.
Uncompressed images are a collection of large numbers of bytes that are of no use and increase the loading time of your WordPress site.
Image compression is simply transforming digital images into their lesser sized version via encoding information using lesser bytes. Lossless and lossy compression are two main types; they have different use-cases and processing methods.
There are multiple types of image compression tools available that you can use to resize or resolute your images.
- Adobe Photoshop
- Compress now
- On1 Photo
- GIMP
- Affinity
You can also use web tools like:
3) Implement Lazy Loading of Images
The word ”lazy” is often associated with something we want to delay or procrastinate. The same stands true for the lazy loading of images.
[source: Imperva]
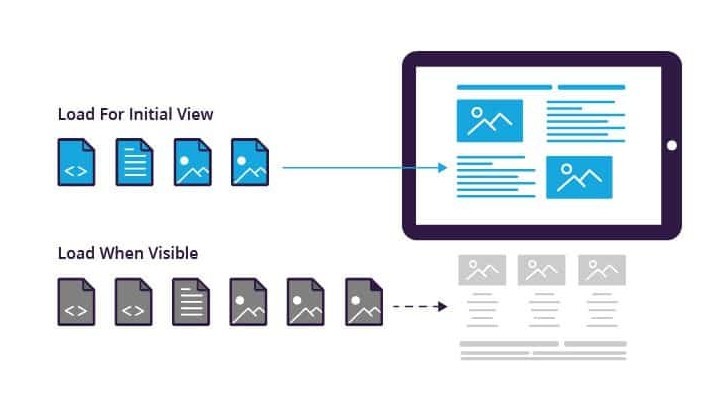
Normally, a single web page has multiple images and all of them need to be loaded before and as the user lands on the page. Sometimes, the user doesn’t even scroll down till the full length of the page (doesn’t view all the images) and leaves but all page resources have been loaded in advance.
The lazy loading loads only those images that are important for the initial view, whereas the remaining images are loaded afterward.
It simply means that when a user visits your site, the images do not load immediately. Instead, they will load as you scroll down the web page. So, lazy loading decreases the load time of your web page.
The lesser the images to load, the lower the bandwidth consumption. Hence, it will enhance your website’s performance.
You have various tools to identify and improve the quality of a webpage. Also, there are tools available that you can use to check whether the image uses lazy loading or not.
4) Use Correct Dimension
Correct dimensions are a crucial factor when it comes to increasing the load time of your WordPress website.
Uploading large image files on your site will affect your site and performance very badly.
Besides choosing the right format of images, you should be very careful about the size of your image. Never upload a high-quality image on your site for displaying.
How to determine the correct image dimensions?
You can use “page ruler” and “browser extensions” to take the measurements of your image dimensions.
Above all, you should also focus on some tips:
- Never use 100% in the quality image slider; always set it to (60 to 70%)
- Use PNG/GIF image format for animated graphics with solid color
- Optimize the image using extra tools and plugins available
There are also various WordPress plugins available that you can use to make changes to the size of images. I’ve compiled a list for that.
Meanwhile, for minor uses, there are also various tools that you can use to optimize your images:
5) Replace GIFs with HTML videos
Animated GIFs can make your user experience more engaging and satisfying. You can use Gifs in certain sections to make it more interactive and make your content more compelling and real.
But do you know?
It is very difficult to optimize GIFs.
People spend a lot of time optimizing the quality and length of GIFs and end up giving up on the task.
So, how to optimize GIFs?
You can use HTML videos instead of GIFs as they are smaller in size, have more colors, and details, easy to insert into web pages. And most importantly, it takes less time to load.
There are multiple HTML video formats:
- MP4
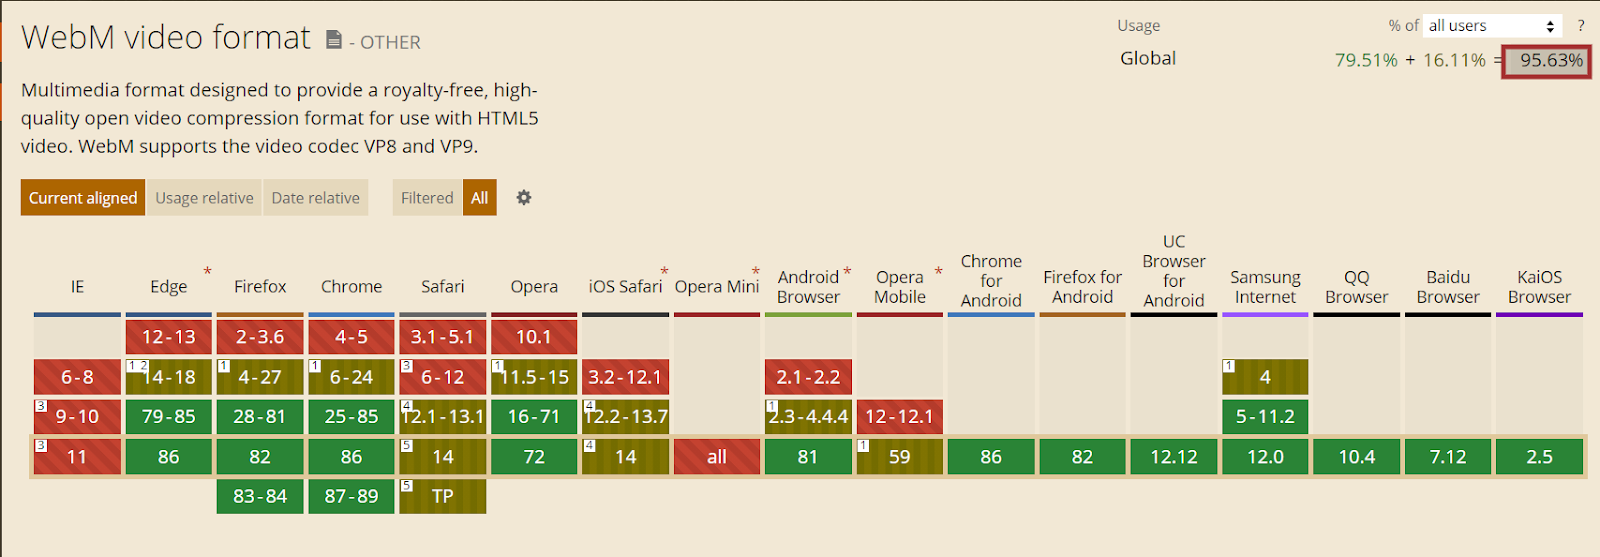
- WebM
- Ogg
- Flash
- QuickTime
And out of these, MP4 is mostly used video format which is used by almost 98.42% of all WordPress websites to optimize the GIF file.
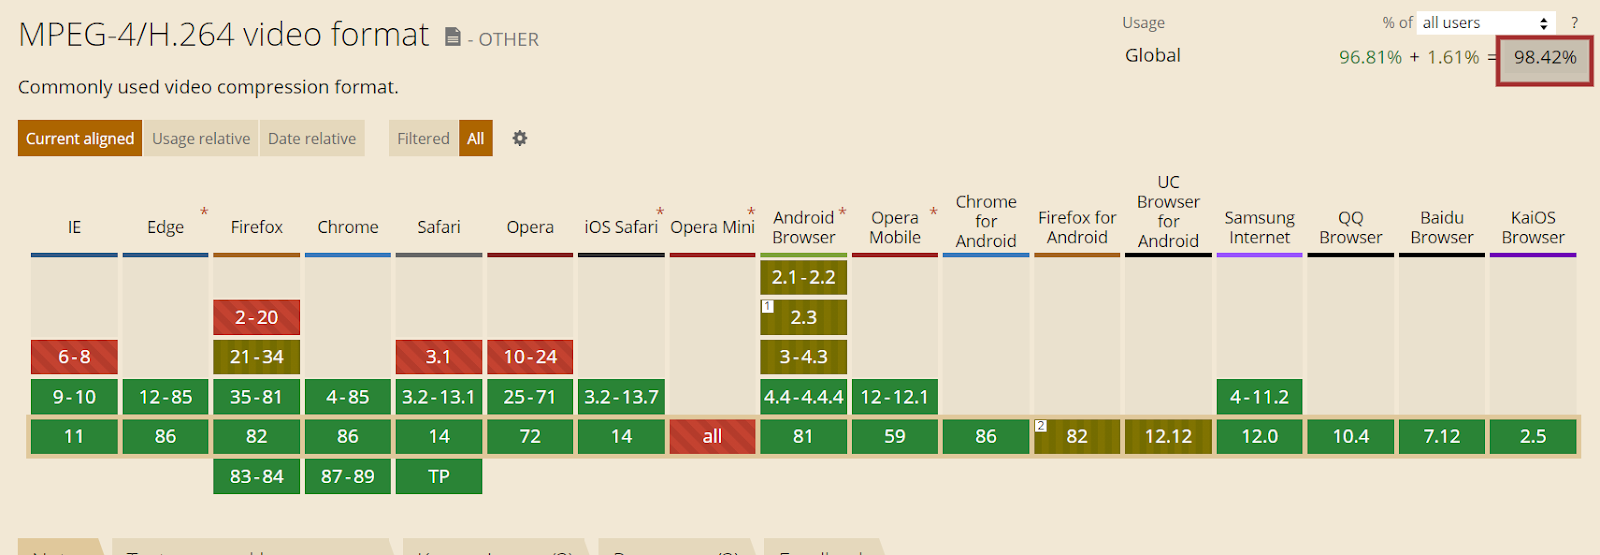
WebM is another most important video compression format which is used by almost 95.63% of websites.
For instance, look at the conversion of GIF to MP4
GIF VIDEO
MP4 VIDEO
How to convert GIFs to HTML videos?
You can use simple image conversion tools and plugins available to convert GIFs into HTML videos.
6) Use WebP Image Format
WebP is a new image format by Google that supports both lossy and lossless compression of images. Also, it supports transparency, bitstream, and graphics.
It gives a vibrant, more clear, and lighter quality to images.
The website which uses this format of the image has decreased loading time and the total weight of the web page.
Why choose WebP?
Google has done many studies on the WebP image format and found that the WebP can compress 26% smaller with lossless and 24-34% smaller with lossy images.
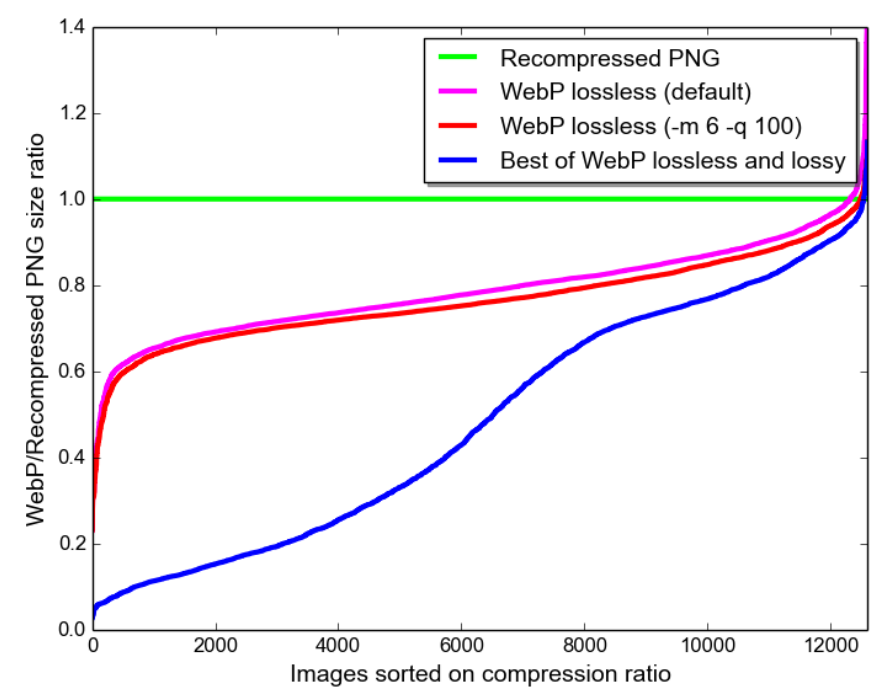
The compression density of WebP is far better than any other image compression format.
When WebP is run in the default setting, it compresses 42% better than lib png.
This proves that WebP is best for increasing website speed. But besides this, it is not usually preferred by all web browsers.
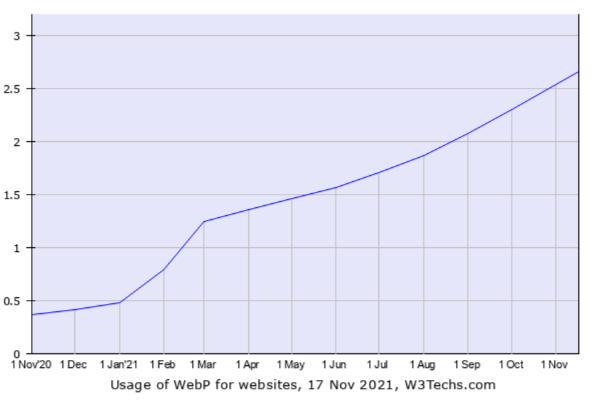
Only 2.7% of all websites use WebP image format to compress images.
This is surprising, this is probably because switching to WebP format is not that easy like in the case of other image formats.
But if you want the best results, it needs some extra effort for sure. Therefore, if you want your website to load faster, start using WebP.
So, these were the ways for WordPress image optimization. But a few burning questions remain like what are different image types? What type of image should one use for optimal performance? And so on.
Let’s explore the answers.
What Are The Different Image Formats?
Images are displayed via an image format. Frankly speaking, there are a plethora of ways to image format available over the internet. But here we will discuss some of the most commonly used image formats.
You can see the below stats to identify the most relevant image format for your site.
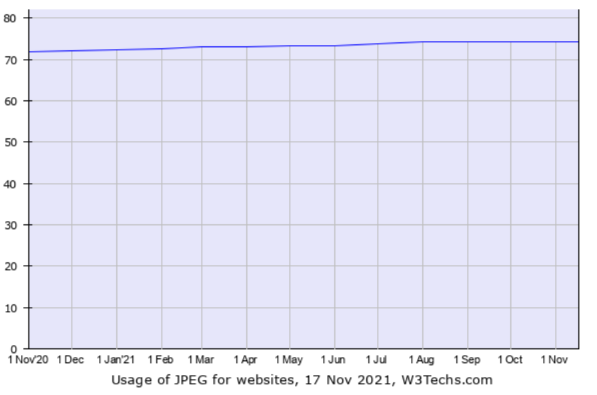
JPEG (Joint Photographic Experts)
JPEG is a standard image format that contains lossy compression, i.e., which reduces the image size by eliminating some data and without degrading the quality of the image.
It is the most commonly used image format around the world. The extension for JPEG format is .jpeg.
JPEG performs best at its photographs, painting, and realistic scenes with a slight color variation GIF-like For Web Pages. It allows the user to control the compression ratio and allows the user to commutate the quality of the image for a small size.
Advantage of JPEG
- It has high-quality image data with a lossless compression
- JPEG formats images are quick and efficient for sharing
- Need minimal space for the storage of images
- Less load time
The JPEG format is used by almost 74.2% of all websites.
PNG (Portable Network Graphics)
This is another popular image format that is widely used over the internet. It supports lossless data compression i.e. it perfectly regains the original image data from compressed image data.
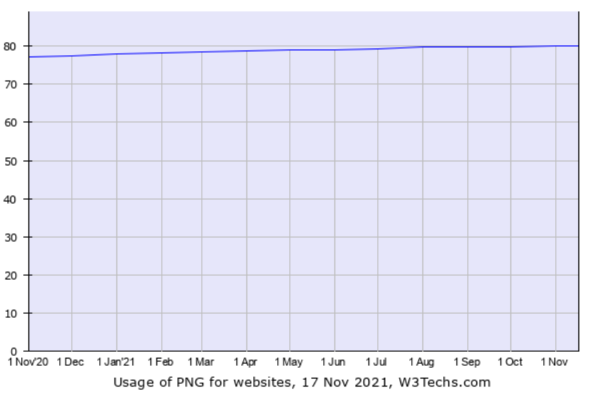
According to a survey, PNG is used by almost 80% of all websites.
SVG (Scalable Vector Graphics)
The SVG image format is used by 40.3% of all websites. It supports extensible markup language based on two-dimensional graphics with animated and interactivity effects. The advantage of the SVG format is, it is very simple to use.
It can be edited with any of the text editors as well as any image software.
GIF (Graphic Interchange Format)
It is the newest and most lovable animated graphics. You can convert a long video into shorter ones easily via gif. You also have the opportunity to create your gif by using multiple images.
It supports lossless data compression to reduce the size of the video without degrading its quality.
Here are various tools available by which you can easily create your GIF-like:
- Kapwing
- Make a GIF
- Gyazo
- Recordit
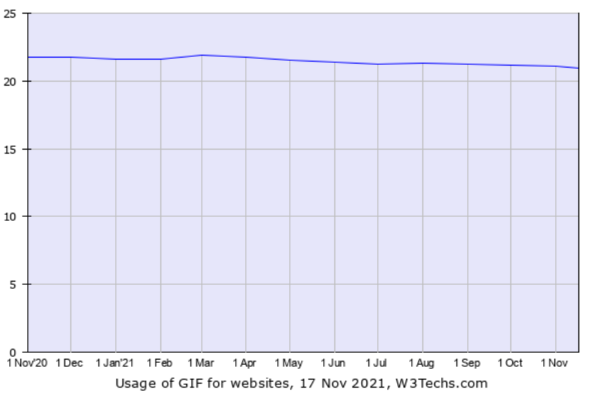
The GIF image format is used by almost 20.9% of all websites.
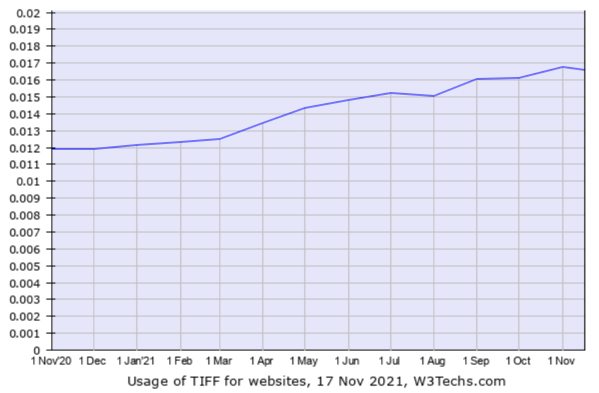
TIFF (Tagged Image Format)
TIFF is a high-quality image format by Adobe that involves both lossy and lossless compression. It is widely popular for its high-resolution compressed image. It is used by less than 0.1% of all websites.
These are the major image formats that are used by almost every website on the internet.
Which Type Of Image Is Best For Website Performance?
Before uploading your images on WordPress, just make sure you are picking the right image file format.
Therefore, always choose the best file type option. There are several options available:
- Vector image graphics– These are commonly used for geometric shapes.
- Raster image graphics– Raster images are all digital images that use multiple rectangular pixels arranged in grip patterns to identify images.
Normally we use raster image graphics for our web pages. Here are some examples of a raster graphics image format:
- JPEG
- PNG
- GIF
- SVG
- TIFF
I already have explained the pros and cons of these image types. The usability is still in question.
Where should you use JPEG?
You can use JPEG format to optimize a photo, screenshot, or any other digital image asset.
Where should you use PNG?
You can use PNG for:
- High-resolution images, as it does not fit on lossy compression.
- Conversion of geometrical shapes.
For branding or for a customizable look where the image text is not zoomable or searchable, you can use PNG.
Where should you use GIFs?
To reduce the video size or to upload videos, use gifs.
This gives you a basic strategy for image optimization and implementation, but these are not rigid rules.
Which Image Size Is Perfect For WordPress?
Different blogs have different sizes of images but if we talk about the ideal size, it should be under 1200 x 628 pixels. You can use the size according to your need.
We at MakeWebBetter use the following image sizes for our WordPress content and marketing activities. You may take references from the same to make your content more engaging and optimized.
- Feature Image- 1080*682
- Internal Image-862*510
- Press Release Image- 1000*700
- Email Image- 600*600
How to compress the size of images?
There are various tools available to compress the images:
- CompressNow
- Optimizilla
- Compressor.io
- TinyPNG
And that’s it.
Lastly, I am going to list out the best image optimization plugin.
Top 5 WordPress Image Optimization Plugins
The best thing about WordPress is it has thousands of options for customization. There are a couple of dozen image optimization plugins. Below I have compiled the list of best Image Optimization plugins for WordPress and WooCommerce.
1. Smush

Smush is one of the best image optimization tools out there. Even we use it on our website. It automatically compresses the images and assures both speed and quality.
It ensures lossless compression and lazy loading. Also, you can bulk optimize 50 images and set a maximum size for compressed images. If you don’t want to invest time manually optimizing images, you can enable automatic optimization.
Other Major Features of Smush:
- Directory Smush
- Gutenberg Block Integration
- Multisite Compatible
- Smush processes PNG, JPEG, and GIF.
- Convert to WebP (Pro Only)
2. Optimus – WordPress Image Optimizer
As the name suggests, Optimus is certainly the best when it comes to lossless compression. It optimizes and compresses images to 70%.
The Optimus plugin sends images to its server As the image files are being uploaded to the media library. Then, the Optimus plugin saves the optimized version of the original image in the media library and displays its compression percentage. It also optimizes the thumbnail images.
After the WordPress image optimization, your image files are deleted from the Optimus server. So, you don’t have to be concerned about your privacy.
Most importantly, Optimus does let you have a say in the compression process. You can choose to remove the EXIF and IPTC metadata.
Major Features of Optimus
- Optional: HTTPS connection for the image transfer (Optimus HQ)
- Optional: conversion to the WebP image format (Optimus HQ)
- Faster load times for blog pages
- WordPress multisite-support
- Bulk optimization (optimize existing images)
3. Imagify – Optimize Images & Convert WebP
Imagify is a peculiar WordPress image optimizer as it enables the users to have quality control.
There are three quality parameters that you can choose: Normal, Aggressive, and Ultra.
Normal compression ensures a lossless image compression. Aggressive compression results in minimal loss of quality. And Ultra results in compression with a noticeable drop in quality. You can choose to apply any of these as per your requirement.
Imagify can compress the fresh images files and the unoptimized ones from your WordPress gallery. It also optimizes and compresses all types of images: JPGs, PNGs, PDFs, and GIFs.
The best part is that this plugin has a backup option that allows you to restore an image to its original version.
4. ShortPixel Image Optimizer
![]()
ShortPixel Image Optimizer is one of the most popular WordPress plugins It has over 300,000 active installations.
It offers both lossy and lossless compression for multiple image types such as JPG, PNG, GIF, WebP, AVIF, and PDF files irrespective of size.
Moreover, it can convert JPEG, PNG, or GIF (Animated or not) into WebP and AVIF, which is productive for improving your ranking.
ShortPixel works for both WordPress and WooCommerce. The free version enables users to optimize 100 free images monthly. The pro version starts from $4.99 that allows 5,000 image credits per month.
Amazing Features of ShortPixel
- 24×7 Support from developers
- Test lossy/glossy/losses versions of your images
- compatible with WPML and WPML Media plugins
- Option to deactivate auto-optimization of images
- Generates a 30-day image optimization report
5. EWWW Image Optimizer

The name of this WordPress Images Optimizer probably made you chuckle. But the wonders it does for your website will make you WOW.
EWWW Image Optimizer works on images as they are being uploaded as well as the ones stored in the media gallery. With the paid version, even an 80% reduction in image size is possible.
It optimizes your images and enables progressive loading on your website. There is no limit on the file size for compression. You can convert and compress images in bulk.
The best thing about this plugin is that it is tested with hundreds of themes and plugins. You won’t be facing any compatibility issues at all.
Important features of EWWW Image Optimizer
- Automatic WebP conversion with Easy IO
- Optimize all the images from a single page
- Schedule bulk image optimization
- Compress WordPress theme images
- Bulk optimization processes from the command line
So, these were the best plugins for WordPress image optimization. Few of these tools are even compatible with WooCommerce and can smoothly run on your online store.
Final Words
WordPress image optimization is not that easy but if done correctly, it can have a great impact on your site.
Search engines do not like slow-speed web pages nor does your audience. In today’s crunching digital competition where customers can easily switch to other brands to find a substitute for your product, a single second of website loading time can make all the difference.
I hope through this article I was able to guide you on the topic of image optimization for WordPress websites. If there’s something you would want me to add to this article, please let me know in the comments.
About the Author: sanjeevmaurya